Tuesday 27 May 2014

Daisy, Daisy, what will we do with you....


daisy motif with beads

There's been lots of daisies & lots of making bits going on this weekend - I keep flitting between this 'n' that just like the baby birds that have been fluttering about in the garden (they are so cute and distracting I can waste hours watching them!)


Baby Sparrow


I think it must be a good year for the daisies as they seem to be out in abundance everywhere I look which got me to thinking about using them as an inspiration for a new project and had me humming 'Daisy, Daisy...' all over the place!  I began to wonder about the song and who Daisy might have been and discovered the ditty was written by songwriter Harry Dacre in 1892 and was said to be about a certain Frances Evelyn 'Daisy' Greville, Countess of Warwick.

Countess 'Daisy', born in 1861, was a British Socialite who's mother was said to be a descendant of Charles II through one of his mistresses.   Apparently she was once up for consideration of marriage to one of Queen Victoria's sons but either it turned out he loved someone else or she didn't particularly like the stuffiness of Royal life and went on to marry Frances Greville, Lord Brooke aka 'Brookie'.  They lived together in Warwick Castle where Daisy was said to hold lavish parties and even hosted seances which were de rigour at the time. She was also an aficionado of the bicycle which has to have had something to do with the song lyrics too don't you think?


 This image is in the public domain due to its age (file from the Wikimedia Commons)

Daisy, herself a veritable fashionista with dresses regularly shipped in from Paris, and 'Brookie' became part of a very swanky social set headed, no less, by Albert, The Prince of Wales (later to become King Edward VII). Not only that but, it was said, Daisy also began to have a number of affairs with powerful men - including the Prince!  After that she fell in love with a millionaire (and had 2 children by him) but he went on to marry someone else and she was pretty broken hearted.   However,  that was not the end of the  scandalous affairs, partying and gossiping surrounding her and eventually she hit upon hard times - having spent much of her money on her lavish lifestyle!  She even sank so low that she tried to publish memoirs about her affair with the prince but she was hushed up and another time it's said she almost went to prison!  

Daisy was not a discrete person and eventually earned the nickname 'The Babbling Brooke' due to her inability to keep details of her affairs quiet.  During her life of scandal she somehow managed to find time to open a school of needlework in Essex amongst other philanthropic establishments, and get involved in social politics and was quite a vocal supporter of Women's suffrage.  She became a bit of a writer (one of her books was about William Morris and the Arts & Crafts movement) and she did eventually publish her own memoirs titled 'Life's Ebb and Flow' in the late 1920s.  Quite honestly it all seems a bit of a risqué sort of life and a real daisy is such a small, unassuming little flower it seems inadequate for such a colourful character!

Anyway - let's get back to my garden daisies and see what  project they inspired...
addicted to making
Simple... pure...ponderings...


daisy chains
sweet & innocent...those hours spent threading one through another as a child...


There are so many possible ways to make a daisy but in the end I decided to make a little beaded 'motif' and all you need for this is some thin beading wire (0.4mm is good) and seed beads in yellow & white. 


how to make a beaded daisy


Here's the step-by-steps...

1) Cut a fairly long piece of wire and thread a dozen or so beads onto it (the size and number of beads will determine the size of the centre of your Daisy)


2) Thread one end of the wire back through the last bead and pull to close the beads into a circle...


addicted to making


3) Next, bring the long end of wire up through the beads and thread on enough white seed beads to give you a petal (size of your choosing) and thread the end of the wire through the next bead along...


4) Continue to add beads and take the wire through the next bead so that you begin to make lots of petals..


beaded flowers

how to make a beaded daisy

how to make a beaded daisy


5) If you run out of wire simple add some more on by wrapping a new piece around the centre' a couple of times, trim, squash in the end and then continue..


step by step flower tutorial


6) Work all the way around until you have lots of petals then wind the wire around the centre a couple of times to finish. Trim & tuck in the end neatly. If some of your petals are a bit loose you can gently twist each petal (but be careful as if you stress the wire too much they might snap off!)


how to make a beaded daisy


7) Now all you have to do is decide how to use your motif.. here's a few ideas to get you going:


how to make a beaded daisy


I hope you have fun making these little beaded flowers - you could make lots in all different sizes or link them to make your own daisy chain (don't forget to experiment with other colour combo's too).

Happy Bank Holidaisy :-)


All pictures (c) Addicted to Making 2014 

Friday 23 May 2014

Blue with a dash of pink..

Here we are at the end of another week and for the early part it was beautiful blue skies & fluffy white clouds all day! It was so warm & summery that I even (shock horror...) dug out an old pair of shorts & birkies!

Inspirational blue & pink!

I have been-a-making but also having fun with a spot of retail therapy. As nothing is quite ready to post yet as a new project, I thought you might like to share in my therapy and take a little peek into what I have been out gathering in readiness....  

First up is this total impulse buy which just needs a little spot of up-cycling to make it perfect for my craft space.  I just fell in love with the colour!

small vintage stool
Oops... 

Doing it up is really an outside job and unfortunately it's raining today, but it is a long weekend - hooray! - so if the weather cheers up I should be able to make a start on it...exciting :-)

Next up is another blue tone & very random purchase - even Teddie was curious! I have no answer as to why I got it (and Easter is long gone so I can't even pretend its because of that).  I just liked the pattern and colour..I guess it simply appealed to me...

Not for Teddies!

That purchase was quickly followed by this pretty vintage egg coddler. Again it happens to be in blue-ish tones and again I bought it for no apparent reason other than I like the 'Woodland' pattern...

woodland design
I may try actually using this one morning for breakfast...

egg coddler
Even the back of it is pretty!

Now, here's a bit of a clue as to what I might be making something with soon (and yes, it's blue again!)

blue felting fibre
Thought it was yarn?  Look again...


fibre wool for felting
(it's wool fibre for felting)

On a trip into Bath I also bought some new, thinner 'Doll Needles' for tatting (another little clue to what I have been playing with this week but more on that another time).  I was quite pleased to find this pack because the one's I have are quite thick and 'real' tatting needles aren't easy to find...

Tatting needles


And finally, for my irresistible, utterly gorgeous, dash of pink (with a touch of lime green)...

Squiggle yarn 432 strawberries-limes
Squiggly Squeeeeals of delight!

Don't ask me what I will do with it because I don't yet know!  I just couldn't put it down once I picked it up and when I do  make something with it I will let you know.

Anyway, that's me set up for the bank hol along with a spot of gardening, friends, family & Pimms!  And I really hope all this rain makes my newly planted runner beans grow :-)

runner beans
Grow beans grow!

Enjoy your bank holiday whatever you do :-)


All photographs (c) Addicted to Making

Wednesday 14 May 2014

Poldark, Pasties & Picnic Basket Charms...

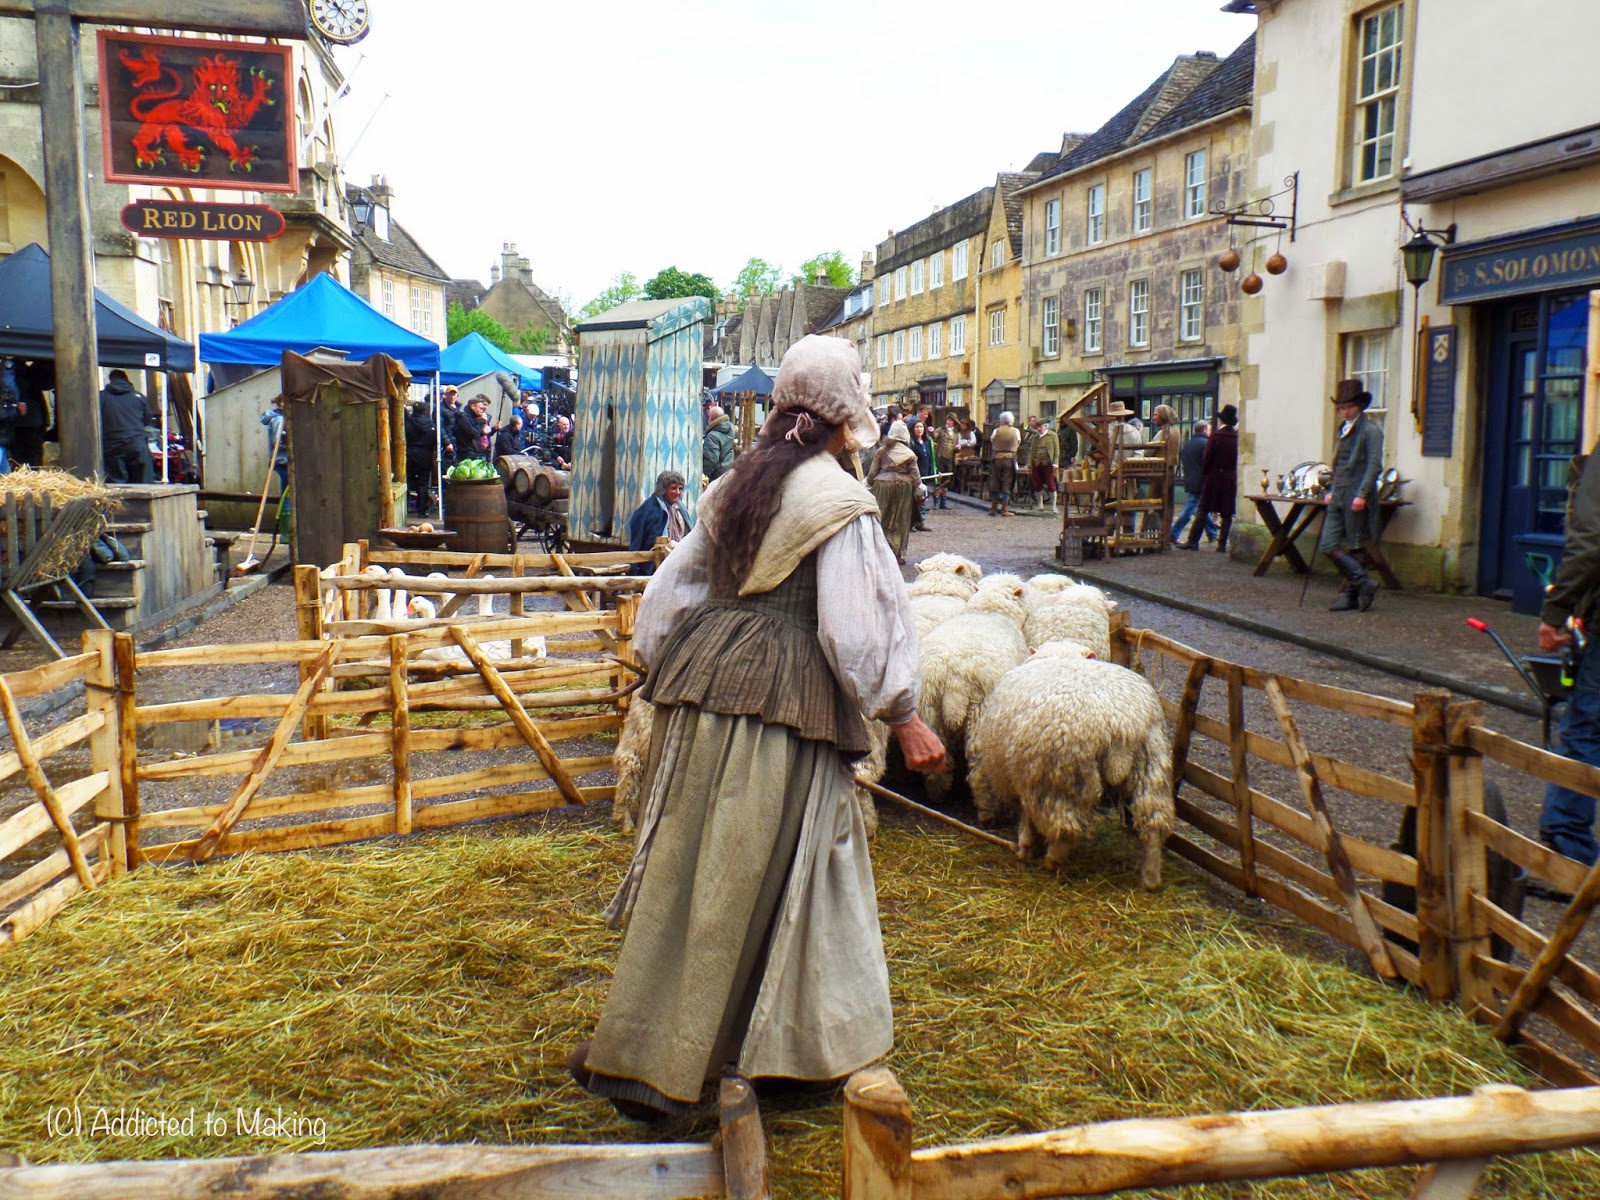
Last week there was much excitement in one of the little towns around here with the arrival of a film crew for the re-make of the popular 1970's  Poldark series (based on Winston Graham's novels).  

I do love a good period drama so couldn't resist popping down with my trusty camera to take a few shots!

Not what I would usually expect to see when I go shopping in Corsham!

It was brilliant - the whole of one end of the High Street had been given an C18th make over!  There were pens of sheep...


...geese...


...with market stalls of all kinds of things...

Loaves and fruits 'n' veg...

Masses of Pasties & Pies (sadly all fake!)

Olde candles...


 ...and even some of the shop fronts had been replaced with more authentic retailers of the time...

(is that the Tardis masquerading as a doorway... that might explain things!)


There were horses & carriages clip-clopping around...


And, in between the rain showers,  a truly motley assortment
of market traders, shoppers & a few Gentry!


I believe that the new series of Poldark will air sometime in 2015.. I do hope they come back again to film some more  (it was only filmed there for a few days and the street is back to normal now)

Actors leaving at the end of the day...

Anyway,  I'm told a good dose of sunshine is due this weekend... which makes me think of summer picnics... and with that news and all the costume drama excitement of last week I expect you can guess where all this is leading... yes - a new (slightly whimsical?) Poldark-market-stall-inspired-make in the shape of a keyring made up of miniature pies!

As you might guess, there are several component parts to this project and you will need to gather up three different shades of brown felt, some embroidery thread & needle, scissors, jump rings, toy stuffing, ribbon and large split ring.  Ready?  Ok, let's start with...

Mini-Pasty..


Cut a small circle of pale brown felt (I used an egg cup to draw around)....

Thread your needle with 3xstrands of embroidery thread..

Fold the felt circle in half and then roll the edge slightly.  Sew around the edges as you work to secure.

Just before you sew up the end, stuff it with a little toy stuffing!

....then just finish sewing up and trim any ends.


Mini-Pie 1...


Cut a small rectangle of dark brown felt into a cross as shown..
Sew up each side...
(you should now have a pie 'base' like this...)
Cut a second piece of felt that will fit as a 'top' for the pie 


...and begin to sew onto the top


  Just before you finish sewing up the top, stuff it with stuffing.


Mini-Pie 2...

Cut a small circle of brown felt... 


Run a tacking stitch around the edge but leaving a long end of thread at the beginning and ends...

Pull the ends of the thread together to gather up the felt


Stuff with a little stuffing

Cut another smaller circle of felt to fit in the top of the pie... 

Pull the ends of the thread and knot so they hold in the felt lid (tip: press down with a pencil)


You should now have 3 cute little pies like this!


... to make the keyring...

Push a jump ring through one of the pie stitches on each pie (or make a little threading hole in the felt with a bodkin) then close the jump rings.

Then simply attach each miniature pie to the split ring with a piece of pretty ribbon.

Now all that's left to do now is to attach it to your summer Picnic Basket and pop off to enjoy the sunshine!

yum yum!


Enjoy :-)


All photos (c) Addicted to Making.