Showing posts with label wirework. Show all posts

Tuesday, 15 July 2014

A necklace for Emmeline Pankhurst...

I've been giving the blog a little bit of a makeover lately and, as you might see, it's a bit of a work in progress so please bear with me if it suddenly looks different or things have been moved around!

How to make jewellery

Anyway, despite the changes, regular visitors to the blog will have already seen a couple of Suffragette inspired projects and with today being Emmeline Pankhurst's birthday I couldn't miss the chance to make a little something could I?!  

Emmeline was certainly a larger than life type character.  She was the founder of the Women's Political and Social Union (WPSU) and leader of the Suffragettes. Born in Manchester and married at 20 she felt very strongly that women should be given equal rights to vote but Parliament disagreed.  Many women supported her from a distance but were too frightened to join and get in trouble so often just wore a small badge or discreet piece of jewellery in the Suffragette flag colours of green, white & purple.

The campaigns got increasingly militant with lots of stone throwing, wire cutting, chaining to railings and worse. Emmeline was imprisoned many times, went on hunger strike and was force fed (a truly horrendous business).  Then came the start of WWI and a kind of truce was called.  As the war progressed women were increasingly needed to fill the gaps in jobs & industries as part of the war effort and eventually that led to an acceptance that they should be entitled to a more equal standing and be able to vote - the first ruling allowed women property owners over 30 to vote and eventually (sadly just after Emmeline's death)  an equal vote to over 21's regardless of gender or status. 

I think Emmeline deserves a little ongoing recognition for her core principals of equality so I've made a birthday tribute to here in the style of an early 1900's Suffragrette necklace - to make your own necklace you will need: 0.6mm gold plated wire, golden chain & various jump rings/eyepins/headpins, 2 x green czech crystals, 1 x small white freshwater pearl, 1 x small purple crystal heart, assorted pliers/cutters.


Begin by wiring up the two green crystals - thread them onto eye pins and make small loops on the opposite ends.
Suffragette jewellery


Then thread the crystal heart onto a bail or jump ring.
Emmeline Pankhurst jewellery


Thread the freshwater pearl onto a headpin and make a wrapped loop on the end (video for wrapped loops here). Then attach it to a small jump ring and add a further jump ring either side of that (so you have a 'chain' of 3 with the pearl in the middle).


Cut a piece of 0.6mm wire and use pliers to shape it as per the picture below (tip: begin by folding in half over your round nose pliers to make the central loop)
how to make a Suffragette Necklace


Use a small jump ring (or two) to attach the crystal heart to the loop in the middle of the wire shape..
making jewellery


Next,  attach the pearl to the centre of the wire by opening the small jump rings either side and closing them onto the 'frame' as shown below.. 


Attach one of the green crystals to one side of the wire frame with a jump ring and then use another to attach it to a piece of chain...
wirework necklace


Repeat on the other side then adjust the chain to your preferred length to finish off. The wire is fairly flexible so you can tweak the shape of the frame if you need to.
How to make a Suffragette Necklace

Happy Birthday Emmeline!

Hope that inspires you to make your own Suffragette style necklace. 

I'm pretty excited that there is a new film due for release later this year called 'Suffragette' starring the likes of Helena Bonham Carter, Carey Mulligan  & Meryl Streep amongst others *rubs hands with glee* so no doubt there'll be a few more Suffragette inspired projects sometime in the future ;-)

Happy Making !


All pictures & texts (c) Addicted to Making 2014

Thursday, 8 May 2014
Blossom, Brides & Pretty Bangles...

Addicted to Making Blog
O, the month of May, 
the merry month of May!

...or so the 16th Century poem by Thomas Dekker goes.  Will you just LOOK at those gorgeous apple blossoms  - although they are already going over since I took this pic and all too quick for my liking! I want them in my hair. I want to dance in light spring rain. I want to make them... but maybe not today.

Ok, fantasy moment over.  I've finished the commissioned bridal pieces which means I have had time to have a play and as promised in my last post here's a super simple bracelet project that you can whip up in no time. All you need for this project is some memory wire, cutters (make sure they are the proper memory wire ones or you might blunt your ordinary ones), round nose pliers, crystals, pearls and a suitable charm.

To start, cut yourself a piece of memory wire large enough to fit your wrist but with a good overlap to allow for turning loops.
how to use memory wire


Use your round nose pliers to turn a loop on one end..

addicted to making bracelets

Begin to add some crystals & pearls in a pattern of your choosing (or random looks good too)...

memory wire bracelet

Add beads all the way around until there is just enough wire left to turn a second loop...

bridal charm bracelet

Now just add a pretty charm to one of the loops!

wedding day bracelet


..and in the words of our poet surely the bride will feel like a Summer's Queen ... 

bridal charm bracelet


Enjoy xxx


All photos (c) Addicted to Making.

Monday, 27 May 2013

Promises, twisting wire & the Mini Beaded Crown


Well I did promise the crown would follow so here it is and you still have time to make one (or two...) before the Coronation!  


Part of my inspiration came from the crown on this gorgeous vintage embroidery sampler that was taken from HM Queen Elizabeth's first Christmas broadcast in 1952 where she paid tribute to her late father and asked that people pray for her on her Coronation Day the following June (1953).  I don't know who worked the sampler but the stitches are absolute quality.

So, back to the project.  You will need some seed beads, thin wire and pliers and the key to it all is really twisting the wire and tucking it neatly 'inside' the crown so it doesn't show as you work.


To start with you will need to cut a longish length of wire - around a 12" ruler type length should do it.  Thread 18 x red seed beads onto one side of the wire and thread through the other side of wire as well (like below...)


Pull the wire ends tight so it looks like this...


Then thread on another 18 x red seed beads (with both ends of wire threaded through as before) and pull tight until you have a sort of 'figure of 8' shape ... 


Squash so one circlet sits on top the other.  Wind one of the wire ends around the two beaded circlets to secure them together...


...then trim the end neatly and thread 7 x white seed beads, 1 x red seed bead, 7 x white seed beads onto the other wire end.. 


Bend the beaded wire over to the opposite side of the crown base and wrap the wire end around the circlets to secure.  Trim the end neatly.


Attach a new length of wire at the top of the crown (next to the red seed bead in the center).  Thread 7 x white seed beads onto one side of wire and secure to the circlet base.


Then add 7 x white seed beads to the other side of the wire and repeat as before..


Continue beading the wire (add another piece if necessary) to make the final pair of beaded wire stems then finish them off by twisting together, adding some blue seed beads to make a little loop then giving a final twist & trim (try to tuck any ends underneath so they don't show) 


Ta-dah your little crown is ready! What will you do with yours?  If you make another one and add an earring finding to the loop on the top...


...you'll have a right royal pair of earrings!


                                 Happy Regal Making!


Sunday, 19 May 2013

Retro-posting, Her Maj & wearable bunting!

how to make a beaded bunting necklace
This is a bit of a retro-post as I've been a good girl trying to rest my hand a bit since those jabs and staying away from anything that involves too much effort on the knuckle joints.  I'm glad to report that they are looking much more settled now so it was all worthwhile!

I've been doing a bit of light crafting and have made up the project I wanted to show you pre-jabs, that was inspired by a lovely day out (see the bunting necklace in the picture above) and I've just finished another one  - the little beaded crown - which will fit nicely with the up-coming celebrations for HM Queen Elizabeth II's coronation anniversary!

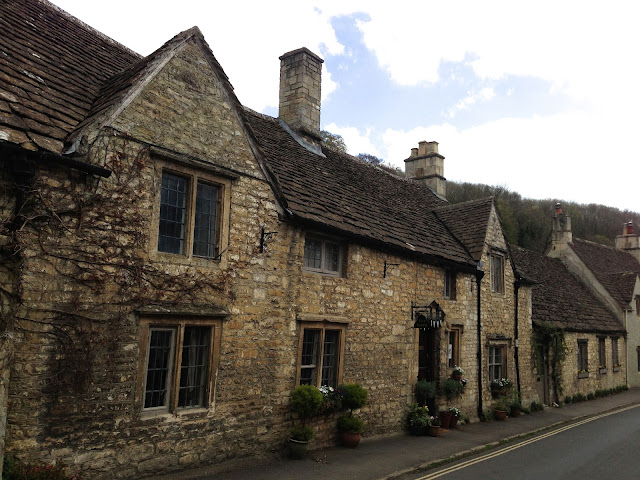
My inspiration started after a walk about a local village, more recently famous for it's racing track, called Castle Combe.  It's on the edge of the Cotswolds and you can see lots of the famous Cotswold Stone in the rows of pretty little cottages..
Castle Coombe Village

I believe that there was once a hill fort which was used by the Britons, Saxons and later, the Romans to protect  'The Fosse Way' (a long Roman Road that ran from Exeter to Lincoln) and that it was the Normans who would later built more of an actual 'Castle'.  Sadly, all that can be seen now is a vague outline or what's commonly called an earthwork

There's a good couple of public houses in which to have a nice Sunday lunch (and yes, we did..nom nom!) plus an old market cross around which the village was built and the obligatory Medieval village Church...
medieval church in castle combe


One of the things I love most about old places like this is simply looking at all the interesting little features such as this old door bell pull (spot the studded door too!) I bet the bell on the other end was loud...


And I wonder what the people who peeked through these ancient looking, time worn window frames saw...


This lantern looks more modern to me but is still quite in keeping with the overall look I guess.....


It's also one of the few places you'll go nowadays where there is someone selling their homemade wares in front of their house with just an 'honesty box' for payment - in this case lots of scrummy looking cakes...
(I think it was the flag on this house that triggered my bunting idea!)

Right at the bottom of the village the road goes over a bridge by some old weavers cottages...
Castle Coombe Village By Brook
You can see why the village has been used as film locations in the past!

Then the bridge goes over the 'By Brook' which was used to power the mills of the prosperous wool industry era in the Middle Ages....
Castle Coombe Village By Brook


There's a magnificent Manor House (hotel) built in the 14th Century and of course, just outside the main hub you'll find that famous race track which was built in the 1950s (just after Silverstone) It's all very traditional and all in all I can recommend it as a very pretty place to potter about on a sunny day!

I'm afraid I'm still a little slow typing things up so the crown tutorial will have to follow later, but would you like to see how I made the 'village bunting' style necklace...?
How to make a beaded bunting necklace

You would?  Ok here goes...

First gather your bits 'n' pieces such as selection of pliers, some tiger tail, thin jewellery wire, crystal beads, seed beads, small spacer beads, crimps, crimp covers and a trigger clasp (oh - and a couple of clips to hold the beads on the necklace while you are working will come in very handy!)
beaded bunting necklace step by step instructions


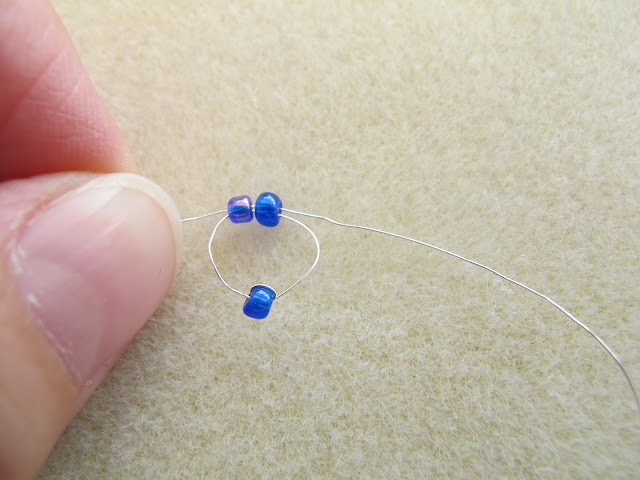
Start by cutting a long length of fine 0.2mm beading wire (around 16-18cm should do it but this will ultimately depend on your seed bead size).  Slide a single seed bead onto the middle of the piece of wire then secure it by passing the wire back through it once.  
wire and beads
 Next, thread 2 x seed beads onto one side of the wire and thread the other side of wire through from the opposite direction as show above. 

Pull both wire ends firmly so that the beads end up sitting above the single seed bead nice & neat as shown below...
beading with seed beads and wire


On the next 'row' add 3 x seed beads to the wire as before, then pull the wire ends to sit them on top the stack...


Continue in the same way, adding 4 x seed beads then 5 x seed beads on the next couple of rows...


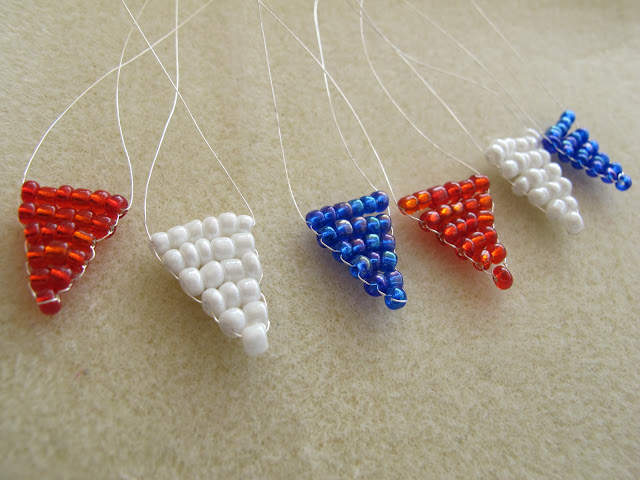
And finally make a row of 6 x seed beads.  By now you should have a nice little seed bead 'flag' shape as pictured below...

At EACH end of this last row, thread the wire through the last bead to secure it...


Now make lots more little flags in the colours of your choosing (I made 3 of each in red, white & blue)...
how to make seed bead flags


When you have made all your flags, use round nose pliers to coil ALL the long wire ends (you may need to trim them if they are a bit too long)....
beaded flag


Now they are ready, cut a piece of tiger tail (around 18-20cm for a shorter necklace) and thread it through one coiled loop of the first beaded 'flag'...


Add 6 x seed beads onto the wire then thread through the other loop on the other side of the flag...


Add a crystal bead between each flag as you continue to work and add all the little flags to the length of tiger tail (remember you can use the clips to stop the beads falling off the ends of the tiger tail - it really helps!)

Make sure you add enough extra seed beads on each side of the necklace wire to make it the correct length for you, then add the endings to *finish off (see the two pictures below).
  
*To finish the necklace ends thread the following onto the ends of the tiger tail: a crimp bead, spacer bead, wire guardian - then thread the tiger tail back down through each one and pull to tighten.  Squash the crimp bead and hide with a crimp cover then add your trigger clasp & a large jump ring to attach it to. Always thread the end of the tiger tail back down through the first few beads before trimming it.


All you need to do now is wear it with pride on 2nd June!


                    Happy Anniversary of your Coronation Ma'am :-)
addicted to making tutorial

....and Happy Making to all of you xxx