Showing posts with label sewing. Show all posts

Monday, 7 July 2014

Sewing, Pins and this old fabric scrap...


Another busy week has passed with not an awful lot of crafting time but an awful lot of computer time - I thinks it's time to correct the balance!


So... I've been watching the new Channel 4 program called 'This old Thing' about how to re-style your Vintage clothing finds and, whilst not quite wanting to start chopping up my Nan's dresses, I have been dreaming about all the scraps of vintage fabric they would be accumulating and what I would do with them!


I confess I do have lots of fabric scraps and love simple little sewing projects the best so I thought I'd make a sewing accessory tutorial for the blog in the shape of a little pin cushion ring which would be very handy to have around during all sorts of 'eek-I-need-a-pin-now!' type projects.  


You will need a fabric scrap, some toy filler, ring blank, buttons, needle, thread & scissors...


Here's the step by steps...


To begin with, draw a circle on your fabric - I used the inside ring of a small embroidery hoop as a template.


sewing a pin cushion


Cut out the circle of fabric...


Choose some cotton - I decided to pick something to contrast and complement the pink flowers in the pattern...


Sew a small running stitch around the edge of the fabric...


Then draw it to gather up the circle into a little pocket...


Stuff the pocket with filling...


Then pull the end of the thread tightly to close it and make a little fabric 'cushion' (..you can knot it if you want but don't cut the end yet)


Next choose your button and, using the same thread come up from the bottom of the cushion to start sewing it on. Pull the thread tightly underneath so the button causes a small dent in the middle of the puff then knot & trim off the end.

How to make a ring pin cushion


Next, use glue or glue gun to stick a larger button to the bottom of the cushion...


Then glue your ring blank onto the centre of the button..


Now just adjust the ring to fit and you are ready to sew!


If you want a bigger pin cushion just cut a larger circle of fabric and, if you are feeling fancy, you could give it a frill, ribbon trim or other such embellishment!  This is a great little gift idea too so hope you enjoy using it as one cute way to make use of your small fabric scraps.


Happy Making :-)


All Photographs & Text (c) Addicted to Making 2014


Monday, 15 July 2013

Suffragettes, Suffragists & the vintage style rosette...

Those of you who remember my Suffragette post will understand how excited I got recently when I heard that there was to be a re-enactment of the The Great 1913 Suffragist Pilgrimage from Lands End to London to celebrate it's centenary in a small town nearby! 


suffragette pilgrimage

In the week or so leading up to the event in Corsham, Wiltshire there had been a display of Suffrage images, posters & fully dressed costume dummies in a couple of 'pop up' shops and I couldn't resist popping in to see it all.

suffragist dummy
Here's one of the fab dummies put out in the sunshine especially for the march!
(note the Suffragist colours)


I had a very interesting conversation with one of the ladies in the pop up shop who explained that there were two types of Suffrage supporters  - the more militant 'Suffragettes' who wore sashes of purple, white & green and had a tendancy to smash windows & generally cause mayhem and 'Suffragists' who also wanted the vote for women but who went about campaigning in a more peaceful way such as this pilgrimage and wore their own colours of red, white & green to distinguish themselves from their rowdier sisters-in-arms.

Apparently they had a good reception in some towns and in others they were shouted & booed at so it wasn't all plain sailing and at times they faced quite dangerous crowds.  In all the walk took around 6 weeks and they managed to collect something like 46,000 signatures for their petition on the way! The event has been organised alongside a play by a theatre group called Dreadnought South West which has been running in towns along the original pilgrimage route to celebrate their amazing, brave journey - you can find out more or buy tickets to see the play here 

So, with all the excitement this morning I grabbed my camera and went along to watch the re-enactment...


The Methuen Arms, Corsham
It all started at the Methuen Arms... banners at the ready!


The Great 1913 Suffragist Pilgrimage
Then it was time to march through the town!


Oxygen play by Natalie McGrath and Dreadnought south west
A little singing & some rousing campaign speeches!
The Great 1913 Suffragist Pilgrimage tribute at Corsham Wiltshire
'Dr & Mrs J E Crisp' welcome the group to the town just like back in 1913..


Suffragist
We want the right to Vote !

The Great 1913 Suffragist Pilgrimage corsham wiltshire
A sea of Suffragists outside the town hall

I think it was really impressive - don't they look brilliant in their costumes?  It must also have been very hot dressing up during this current heatwave in all those long sleeves & skirts but at least they had hats on! 


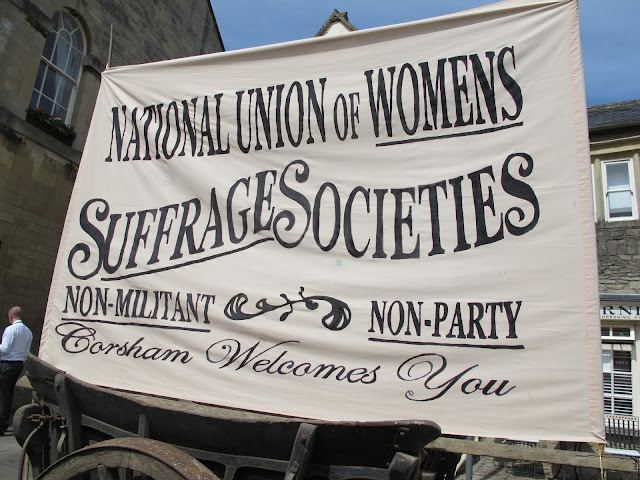
national union of womens suffrages societies

It certainly looked like they had put tons of effort into making everything and I learnt that as well as a local knitting group helping to make lots of woolly flower corsages for the ladies to wear, that a local school had been involved in making banners which were dotted about the town.   

After finding out about the event last weekend I had immediately decided on my own little tribute make for the Suffragists with a campaign style rosette....


If you fancy catching up with the march and would like to make your own version of the rosette here's the step by steps...

1) Begin by drawing out 3 template circles on paper to use as the pattern.  You can make them any size you like for bigger or smaller rosettes but I used 10cm, 8cm, 6cm....


2) Pin & cut your circles out in your chosen fabrics (remember its red, white & green for the Suffragist)....


3) Then make a small running stitch along the outside edge of one of the circles...


4) Pull the ends of the thread so that it bunches up like this...


5) Then flatten out like this...
suffragette rosette


6) Repeat with the other two circles of fabric...


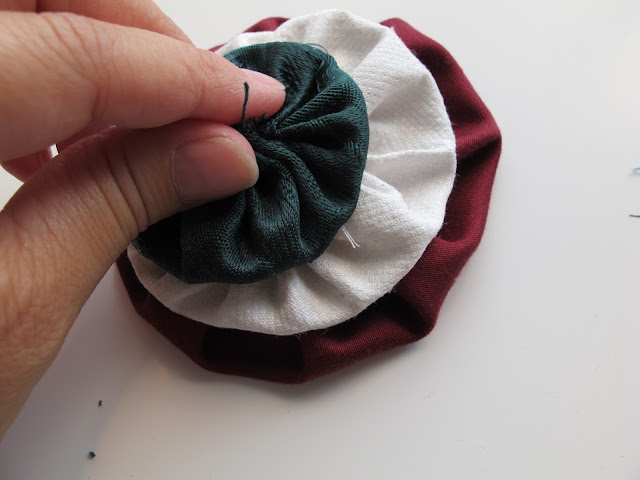
7) Then stack them on top of each other like this..
how to make step by steps for a rosette


8) Find a nice large (vintage) button and a needle & thread.. 


9) Sew the button on top the fabric circles to secure everything then simply add a pin to the back and you are ready to join the march!


A big well done to everyone who helped prepare and take part in the march - I think it was a huge success and it got my vote!


Happy Making :-)

xxxx

Wednesday, 8 May 2013

Saving The Min & Machine Embroidery Experiments (part 1)

This isn't quite the post I was going to write today but I am, how shall we say... a little 'compromised' ?

I was going to write about a lovely day trip we had at the weekend and a little project inspired by it but, after a visit to 'The Min' yesterday ('The Min' being an affectionate name for The Royal National Hospital for Rheumatic Diseases in Bath)  and a couple of steroid injections in my arthritical knuckles I can't really make what I was going to make so that one will have to wait until later.

The Min is a really wonderful old building with such history and an ongoing record of excellence.  I have had several family members receive treatment there and, in recent years, have also been sent for treatment myself.  Sadly, there is currently a big shadow over its future & survival which you can read all about here and I would also be ever so grateful if you can pop over here to sign the petition that has been organised to try and help 'Save the Min' (please do... it would be such a shame for us to loose this national treasure - and please share the links too - thanks)


I didn't actually know I was going to get injected beforehand and had happily browsed round the shops, buying this sweet little ball of primrose yellow wool (ready for yet another project idea I'd had...) 
                              

but unfortunately this is what happens when I try to work with wool and a hand support..... (plus I am supposed to be resting my hand for the next day or so. Hmm.)


Anyway, I decided to look upon it as a crafting challenge and think about what I could do with one hand out of action (so to speak) and so long as I didn't need to grip, press, or use any real pressure it would probably be OK.  So, I thought, how about a bit of machine embroidery....


I've not done lots of this craft before but could remember the general set up for the sewing machine which is basically to set your tension to zero and also the smallest stitch possible.


Then remove the normal 'foot'... (you can put on a special darning/embroidery foot if you have one)


Then cover the 'dogs' (tracks that move the material through - on some machines you can push a button to drop them down) and pull the thread up through as you would normally..


You also need an embroidery hoop (I tried several hoop sizes and found the middle one the best)...


Once your hoop has fabric in it you actually work on the reverse side to usual and need to slide it under the needle and foot attachment 'stem' 

Next, you pull up the bottom thread and hold it with the top thread while you make the first stitch and then you are away.... 

...and I really mean 'away' if you are a bit heavy with the pedal (oops...like me!!)

I started out with a single line of wibbly wobbly text just so I could practise moving the hoop around. And some wibbly wobbly doodles....


Then I tried going over and over some text to 'thicken' it.. ..

     (you don't half get some knotty messes on the back at times!)
eek....

I do quite like that effect so practised a bit more...

hmmm..  not so good but getting better towards the last word ;-)

...and then I practised a bit more. Quite honestly I think the key to it is LOTS of practise and using a thicker fabric (mine was quite thin so puckered easily). Practise, practise, practise... until you have had enough for the day.  I got to a rather-messy-but-starting-to-get-better-looking-bit-of-text before I decided to finish up.

It has to be said that I do not accept defeat easily and decided to tidy up that  rather-messy-but-starting-to-get-better-looking-bit-of-text and rummaged around for my 'stitch ripper' (yes, I could only find my broken one but needs must....)


I discovered that if you remove the messy, squiggly lines and trim the odd ends off that it starts too look a little bit more 'passable' and you can then go back over some bits if needed.


Ok, I know... not super fantastic but remember I was compromised with a cumbersome hand support too (what gratuitous excuse mongering!)

Anyway, finally,  I gave it a press with the iron and... well...I'll let you rate it yourself.

                                 (all tips gratefully received!)

I will be trying this again sometime.
I think. 
Probably.
Maybe. 


What crafting I am going to do tomorrow to get my fix I have no idea - hope you're having better luck with whatever you are making!

xxxx