Showing posts with label beading. Show all posts

Friday, 31 October 2014

Witches, Wire & Wands

I'm still stuck in my temporary crafting space with everything squashed in around me and not much room to create but I couldn't miss doing something for Halloween!  I've done several pumpkin projects in the past so wanted something different.  I cast my eye about for an idea.  Then I saw this stick while we were on the dog walk...

As soon as I saw it I imagined it would make a great Witches Wand for Halloween!  The first thing to do was to strip it (old potato peelers are great for this task)...

I gave it a wash with some soap and left it to dry overnight.

To make the Wand 'handle' I cut a small piece of felt and hot glued it to the stick, wrapping and tucking the ends in as best as I could....


I cut a second, longer piece and glued that on to give it a longer 'handle'..


wicca wand

Next, I took some copper wire and coiled each end loosely...


and wrapped it around the join between the two pieces of felt to embellish the handle a little..

Then I took a much longer piece of wire and did a similar thing at the top of the felt but this time wrapping it all the way up the stick and then back down in a 'criss-cross' fashion.

I used tweezers to 'tweak' the wire which both added a nice effect and tightened it onto the stick.
how to make a beaded wand


After that I just got hold of lots of beads, charms and glass nuggets and, using a dark green covered wire,  began to wrap and attach them all the way up and down the stick in a random fashion (from the handle to the tip).
wire and bead wand

beads and wire wand


A final piece of copper wire was added to the tip  - it's really up to you how you decorate your wand - just go wild!


All you need now is a tall black pointy hat and you are ready to cast a few spells ;-)
witches wicca halloween wand

Happy Halloween!


All photos & text (c) Addicted to Making 2014

Friday, 10 October 2014

Building, Boxes & Dressing for Downton....

So this is the view from my temporary crafting space..  

As you can see it's not hugely inspiring (even worse on a wet day!) but hopefully means I will soon have a lovely new crafting space to play work in.  Anyone who's had building work done will know, it's a necessary mess and you have to play lots of move-boxes-around-the-house which basically means I can't find all the bits & pieces I need to be able to make the projects in my head (still.... it won't be forever...)

It's also very noisy and hard to think straight... as you can imagine I've done very little 'making' recently as a result!  However, this week I had to get rummaging through the boxes so I could find all the pieces & tools to make a necklace for my daughter who is going to a 1920's themed party.  Rather than the usual 'Flapper Girl' style she has gone for a more Downton Abbey dinner dress and I have followed suit with a long beaded necklace with focal tassel. 

I chose a large sequin covered bead for the focal point and decided to add tassels to it. Once you've made the focal tassel bead the rest of the necklace is a sinch..here's the step-by-steps:

I began by securing the thread to the bottom row of sequins and then threaded 2-3" length of bugle beads before sewing back up through them. This was followed by another few threads in and around the sequins before repeating with the next strand and so on..


Keep going, adding as many beaded strands as you can fit around the bottom of the bead. 


Next add a jump ring to the bottom of an eye pin..

Then sew more strands of beads onto the jump ring..


 Thread the eye pin up through the bottom of the bead...
beaded tassel


make your own beaded tassel


Then turn a loop on the end of the wire so it will be ready to thread onto your necklace.


To make the long beaded part of the necklace, first sort out a pleasing arrangement of beads with gaps of around 2inches.


Then begin to knot them onto some thread (waxed cords or synthetic works well)


Work down the first side (work out how long you want the necklace)
1920s lariat style necklace


Add the tassel bead to the center point and bead up the second side..
how to make a long bead necklace

You can leave long ends on either side of the necklace to make it easy to tie and/or adjust the length.


a necklace for Downton Abbey

You should now be ready to dance at Downton!


Happy Making!


All pictures & text (c) Addicted to Making 2014

Tuesday, 29 April 2014

Sweet Peas, Crystals & Intermittent Fasting...

I have before me today, a sea of crystals.... sparkling in the sunlight..


crystal beads


  I could sit for ages just looking at them whilst they catch the light and throw out pretty little rainbows.. but really I should get on because one of today's tasks is working on a commission for some bridal pieces (I do have a bridal tutorial in the wings so will hopefully share that later in the week)

Also so far this week I have been pinching out my sweet peas which I planted a few weeks ago and which have simply shot up!
3 weeks ago...

1 week later...


sweet pea seedling
2 weeks later...


Today...eek!

I can't wait for them to flower - I absolutely love their feminine, papery petals and the delicious perfumed scent of them.  I haven't had much luck getting 'bought' ones established in our garden in the last few years so this year I am planting my own seeds and keeping my fingers crossed.  I haven't decided where I will actually put them yet but there are a few sunny spots to choose from... I will keep you updated on their progress.


'Pinched out' (hoping they grow a bit thicker now...)

My other big 'to do' this week is to try out intermittent fasting as a way of both loosing a couple of pounds (ermmm...ok.. several pounds!) and enjoying some of the additional health benefits it is said to give.  You only have to search for the popular 'Fast Diet' (aka the 5:2 diet) to see how people sing it's praises.  I've never been one for dieting really and I am a terrible sugar snacker (biscuits... easter choc etc) so I hope I am able to keep on the straight and narrow with this simple plan otherwise there's not probably not much hope! 

So, I started with a 'fast day' yesterday and almost managed the target cals for ladies (which I would have made it if it weren't for a couple of dizzy sugar lows...and I'm not into it to feel ill!)  Anyway, today is a 'normal day' so I am having a nice amount of food to fill me up but, I am also now mindful of curbing that sweet tooth so my next 'fast day' isn't too hard.  Right,  I'm off to make another cup of green tea while I play work with those crystals...


green tea


xxx

Monday, 16 December 2013

Festive beading & Snowman Earrings...

beaded snowman charms

Only 9 days to go until the big day! 

For us that breaks out into 5 days of school/work followed by 4 days of last minute shopping, making and generally feeling over-excited! There's also a couple of Christmas parties coming up which led to todays festive theme tutorial which is, as you can see above,  a pair of cute Snowman Charm Earrings! 

As well as being nearly Christmas, it's also nearly the winter solstice and don't we know it with all these dark & dreary mornings (it's definately made photographing the step-by-steps a bit trickier today!)  We haven't actually had any snow here yet - or even a hard frost to speak of but I keep reading that we are going to be hit by 'arctic' weather this winter so I guess we'll just have to see.


Anyway, back to the earrings. You will need to gather up some beads & bits as follows: 2 x 8mm white beads, 2 x 6mm white beads, 2 x large black sequins, 2 x large seed beads in black, 2 x small seed beads in orange & blue plus a couple of long head pins.
free step by step tutorials


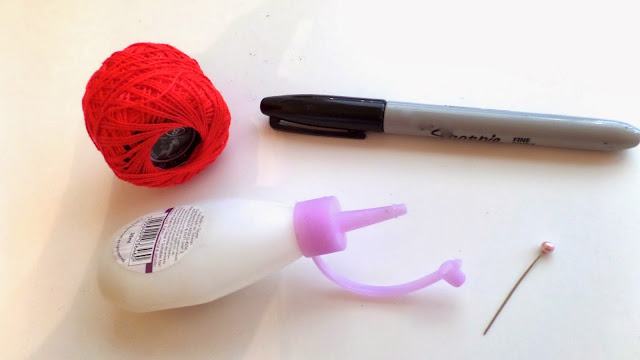
You will also need a black marker pen, glue, pin and some fine red crochet thread.
addicted to making tutorials


I used a variety of tools such as a small crochet hook, scissors, and various jewellery pliers.


So first, prepare your snowman 'head' and 'body' beads - which basically means drawing some black buttons on the large white bead and a face on the small one.

Then make a small 'scarf' by crocheting a row or about 8 chain stitches with a very fine crochet hook (leave the ends and inch or so long for now as it makes tying it much easier)
addicted to making tutorials


Now you can start to assemble the snowman by slipping one of the tiny blue seed beads onto a headpin followed by the 'body' bead.


Then tie the scarf around the pin and add a dot of glue before adding the 'head' bead and holding them together for a moment while they set.


Once set, you can trim the thread ends off the scarf.
how to make snowman


Add another dot of glue and slide on a large sequin and large seed bead for the 'hat'.

Then, the last but most fiddly bit, use a pin to add a minute dot of glue to the snowman's face and pop a tiny orange seed bead on for the 'nose'.  Leave it to dry.
How to make snowman earrings


Repeat the process to make a second snowman with the remaining beads...

Once the glue on the Snowmen has set, you can bend the wire tips over at right angles and trim, leaving just enough to turn a loop.

Use round nose pliers to turn a loop on the tops of each Snowman and straighten up a little if necessary.


Now just add your charms to a couple of earring findings!


If you're not off to a party, these would always make a sweet little christmas gift too...
Snowman Charms

Who could resist these Christmas cuties?!


With not long to go to the 25th the question now arises: will I manage to get another yule tide tutorial done and...you'll have to check back to see :-)


Happy Making!


(p.s. my snowflake background paper for the main picture was from the Christmas issue of Homes & Antiques)