Wednesday, 31 October 2012

Trick or Treat....

Did I already mention that I like Halloween alot ..... ?  Sorry,  it must be the child in me or possibly the sugar high I get from sorting   pinching all the sweeties we stock up on ready for the inevitable flood of local kids ghouls!  

Of course the fun doesn't stop at midnight either because as soon as the clock chimes we enter another skull loaded celebration with the 'Day of the Dead' festival aka 'Dia de los Muertos' !  I probably shouldn't even get started on this one because we could be here a long time but the colours, the sugar skulls, butterflies, folk art and flowers... are just amazing!

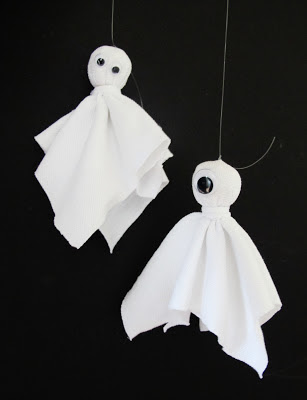
So, back to the purpose of this post...the blog TRICK is this fun little ghostie make which you can knock up in 5mins and give to the kids to dangle on a stick on the doorsteps later tonight....

halloween ghosts


All you need is some scissors, glue, elastic band, needle & nylon thread, wobbly googly-eyes, kitchen towel and white fabric (or you could even just make them from kitchen towel is you have no fabric!).  I used one of my son's old school shirts which he seems to grow out of within the first term and which always have just enough ingrained dirt splodges on to render them too shabby for the second hand shops...


Follow these 6 simple steps:

1)  Cut a square of white fabric
2) Screw a kitchen towel up into a rough ball shape (for the head). Place in middle of fabric square.
3) Gather fabric around the kitchen towel and secure it with an elastic band
4) Cover the elastic band with a scrap of white fabric
5) Glue on some wibbly-wobbly-googly-eyes
6) Sew a length of nylon to the top of the ghostie head so you can dangle it from a stick


I hope you have fun with that - you could make loads and make a ghostie-tree for your window display:-)  Next, the blog TREAT  is a chance to win this fab mix of beads, kindly donated by Beads by Lili  


As you can see it is absolutely b-u-r-s-t-i-n-g with colours, flowers & skulls!  It could be all yours too because it's the very first blog giveaway and entry is easy-peasy-lemon-squeezy!


This giveaway is open to anyone aged over 18 living in the UK and to enter all you need to do is leave a comment below this blog post by midnight EST on Sunday 04.11.12 

The lucky winner will be announced on a new blog post and the beads sent out once they have contacted me with their address (UK only).  The full terms of our giveaways are here so make sure you check them out and then get commenting !


                              Have fun over the next few spooky days
                                                               & 
                                                     Good Luck !

Tuesday, 23 October 2012

Spooky goings on....

pumpkin earrings
You may have noticed it's been a little bit quiet on the ADM blog this last week... listen....shhhhhhhhh....  (cue noise like a tumbleweed)  - is there something spooky going on?!

Well no, not quite yet but it will soon be Halloween so there might be at some point.  I guess you could say that the real world has been that little bit extra 'demanding' recently what with projects, family events and any spare time being spent 'prepping' for the making session at the Pound Arts Centre in Corsham.   It was quite a challenge to get two lots of craft stuff ready (plus samples) and I think I must have checked & re-checked a zillion times that I had everything we needed to be able to make fabric corsages and/or some jewellery on the day!  I'm glad to report that it all seemed to work out well  and there was plenty of creativity, chatter & smiles.

And so it's onto the next event and with Halloween always being a firm childhood favourite, I couldn't resist making up a few little projects to share.  To begin with I got busy with some large round acrylic beads and a marker pen which then, in turn, led to several little spin off project ideas for using them!


First up was my 'Jack O'Lantern' Earrings (main picture at top of blog post) which are pretty simple to make if you have a little bit of jewellery making experience and some pliers - the full step-by-steps are over on my tutorial page if you fancy having a go.

Next up was a dingly-dangly 'Mummy' charm which you could easily make into a keyring or bagcharm.  You'll just need a bit of wire, some white 'rags', glue, string and a large white round bead for the head (if you can draw better than me it helps too ;-)

beaded mummy
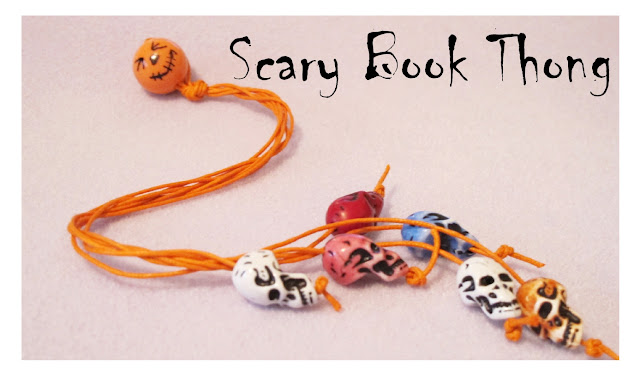
Then last but not least, it's one for the spooky story teller - a scary skulls book thong to dangle between the pages as they tell their blood curdling All Hallows' Eve tales to their terrified audience...

skull book thong
            
I'm putting the instructions for all three projects into one of my mini-make books (link here) and hope you will be inspired to enjoy creating your own set of creepy character accessories!


Until next time....   

Happy Spooky Making!

Tuesday, 9 October 2012

009, bow ties and ......a licence to craft


Apple squash - shaken not stirred.


Yes, that is a jelly sweet 'olive' and this week we are about all things Bond & 9yr old birthday excitement! This last quarter of the year is just about the best thing ever for G - having 2 lots of celebrations, pressies & parties in fairly quick succession (not to mention Halloween & Bonfire Night in between!).  One of his current favourites is James Bond so it is with great timing that the 50th Anniversary also falls in this month! 

With all the upcoming festivities, every Secret Agent needs to dress for dinner so 'M' (aka Mummy) has a plan and a licence to craft ;-)

ADM Productions presents.... 'You Only Stitch Once...' 


For this mission you will need some black fabric, needle,
 black cotton and scissors.


Begin by cutting a rectangle approx. 23x12cm


Fold the long edges of the rectangle to the middle


Fold each end like this..


Then fold both ends into the middle on the back...


Catch the sides with your needle and thread and
 sew them over the top of the ends. Keep the needle
and thread attached..


Cut a small piece of fabric approx. 11 x 3.5cm
 and fold it's edges to the middle as before...


Wrap it around the tie (neatest bit at front)
 and sew into place...


then stitch a brooch or safety pin to the back...

black bow tie

Ta-Da  - a bow tie fit for a mini-secret agent!
(see - there was only one lot of stitching)


 Right, I'm off to blow up balloons, sort out party food & cakes. Oh yes, and before I sign out I can let you in on another little secret...  the first blog giveaway is coming soon!


Happy Secret Crafting :-)